Collection Worksheets
Gateway URL: https://gateway.vectorsurv.org/arthro/ppf/worksheet
Worksheets can be used to quickly generate and print pages for recording collections from a set number of regularly monitored sites.
New Worksheet
Use this section to select the fields you would like to be included in your saved worksheet. It is masked by default, so you will need to click on New Worksheet to access the form.
- Identified By: This field is an optional identifier of the person counting the collections. Only put in a name if the same person consistently counts all collections for the selected sites.
- # of Traps: Use this field to note how many unique traps were in operation at each site. The default is 1, but you can change this value by typing in a value or by clicking the up/down arrows. This field is also optional.
- Trap Types: Select the trap type(s) you wish to generate worksheets for. Multiple values can be selected by using CTRL/CMD/SHIFT keys while selecting values. If more than one trap type is selected, you will create a separate worksheet for each trap type.
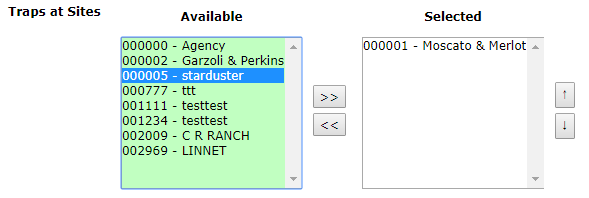
- Traps at Sites: Choose which sites you wish to create the worksheet for. Select the sites by clicking on the site name under the Available column (multiple sites can be selected at once by using CTRL/CMD/SHIFT keys while selecting). Selected sites will be highlighted in blue. Click on the » button to move selected sites to the Selected column. You can remove sites from the Selected column in the same way by clicking on the « button to move them back to the Available column. You can change the order in which the sites will appear on the worksheet by selecting the site you wish to move up or down and clicking on the up/down arrow button.
- Format of Sites: Choose how you would like to display the site information. Default is both Site Code and Name, but you can use the drop-down arrow to select Site Code only or Site Name only.
- Species: Choose the species you wish to monitor from the selected sites. You can select the species in the same way, by clicking on the species name and then clicking the » button to move them from the Available column to the Selected column. The available species to choose from can be managed on the Config page.
When finished, click the Add Worksheet button at the bottom of the form to save the worksheet.
Worksheet Management
This table shows all saved worksheets with the option to Edit, Delete, or Print them.
For each worksheet, the table will show an ID that corresponds to the order in which the worksheets were saved. You can also see how many sites and species were included in the worksheet, as well as the date it was created. There is a column for each available trap type in use by the agency as designated through the Config page, but those chosen when creating the worksheet will be designated with a selection button. Clicking will make that worksheet the default worksheet for that specific trap type. Finally, you have the option to edit, delete, or print the worksheet under the Actions column  . The edit link will open a form to update the worksheet with all the fields as described above. When finished editing, click the Update Worksheet button to save any changes or Close if you don’t wish to make any changes.
The print link will automatically generate a worksheet file for each trap type specified when creating the worksheet. The default output is a Microsoft Excel file with a row per site and M/F for each selected species as columns. The settings for the type of file to generate can be managed under Account Preferences.